12.07.2011

Cookie Exchange: The best Snickerdoodles EVER

It's time for the 2011 Cookie Exchange!


I am excited to share one of my favorite cookies.
SNICKERDOODLES
I LOVE Snickerdoodles. But they have to be soft!
These are so soft & so amazing.
They are the best Snickerdoodles EVER.
I promise you can't just eat one. Don't say I didn't warn you!

Here is what you need:

  • 1 cup (2 sticks)  butter, softened
  • 1 cup sugar
  • 2/3 cup brown sugar
  • 2 eggs
  • 1 tsp. vanilla
  • 3 cup flour
  • 1/2 tsp salt
  • 1 tsp baking soda
  • 1/2 tsp. cream of tartar
Topping:
Cinnamon & Sugar
Like I have mentioned before, I am a cookie snob and I am all about soft cookies.

In a bowl, cream softened butter and sugars together. 
Add eggs and vanilla. 
Beat until smooth.
In a separate bowl, combine the rest of the cookie ingredients. 
I always add in a dash of cinnamon to the mix!
Slowly pour dry ingredients into wet ingredients and mix well.
Chill dough in refrigerator for 30 - 60 minutes. 
Combine topping sugar and cinnamon together. 
Roll dough into walnut sized balls and in the cinnamon/sugar mix.
Place on a cookie sheet.
Bake for 12-14 minutes depending on your oven.
Bake at 300 for 12-14 minutes.
DO NOT OVER BAKE!
I pull them out of the oven as soon as the edges are slightly brown. They might not seem like they are done, but they are. If you cook them longer, they will over cook and be as hard as rocks!
After they have cooled, try not to eat all of them!
And, like I always do....store them in an airtight container with a slice of bread in it (the bread helps keep the cookie soft!)

Now, grab a button & link up your cookie recipes!
The linky will be open until next Wednesday!


12.05.2011

The streak has ended.

One of my very favorite things about Christmas is crying Santa pictures.
Yeah, yeah, yeah.
I know that sounds sick & twisted, but admit it....
Crying Kids with Santa is HYSTERICAL.
I know from experience because my girls have had some classic Santa pictures.
Let's take a walk down memory lane to see how my girls have reacted the past few years.

2007:
Kate's 1st Christmas {11 months}
No crying, but Kate looks annoyed. She must have been thinking, "Get me off this creepers lap."
2008:
Claire's 1st Christmas {3 months}, Kate {23 months}
This is good stuff my friends, good stuff. This was my first intro to a crying Santa picture & I LOVED it. So funny.
2009:
Claire {15 months}, Kate {2.5 years old}
Pure awesomeness. Claire picking up where Kate left off.
(To be honest, I was hoping for a double crying picture in 2009, but 1 out of 2 isn't bad)
2010:
Kate {3.5 years old} & Claire {2 years old}
Last year was when Kate turned a corner, she actually SMILED! She was starting to LIKE Santa!
Claire kept the streak alive & gave a good show:
I knew that my time with Claire being scared of Santa was coming to a close now that she is 3 (that is when Kate started liking Santa). So when I took the girls to see Santa on Saturday, I knew my chances were slim that I was going to get a crying kid picture. I really, really, really wanted 1 more year of tears.
(I am not an evil mom, I swear. Nothing makes me giggle more than these pictures!)
Here is some snippet of our conversation on the way to see Santa on Saturday.
Me: Girls, are you excited to sit on Santa's lap?
Kate: Yes, I am going to tell him I want a puzzle for Christmas.
Claire: I cried on Santa's last year.
Me: (feeling optimistic): It's okay if you cry Claire, you will still get a candy cane from Santa.
(yes, I was trying to manipulate the situation)


But, all my hopes & dreams of a crying picture came to a halt when both girls ran with excitement to Santa's lap.
No fear or trepidation. Nothing but smiles.
2011:
Kate {4.5 years old} & Claire {3 years old}
You should have seen Claire, chatting it up with Santa. Telling him about the boo-boo on her knee & that pink was her favorite color. It was like he was her long lost best friend.
Sigh.
The streak is over.
All good things must come to an end, right?

On to happier things....Don't forget about the 2nd Annual Cookie Recipe Exchange Link Up THIS Wednesday, 12.07.11
Can't wait to see your cookie recipes!

12.01.2011

Pinterest Test Kitchen {Christmas Edition}

Anyone else shocked that it is December 1st?!?!
That snuck up on me....fast!
Since Thanksgiving is over, that means is it Officially Christmas Season!
This week has been full of Christmas crafting & baking, so here are 3 easy projects I pinned & made!

Pinterest Project #1
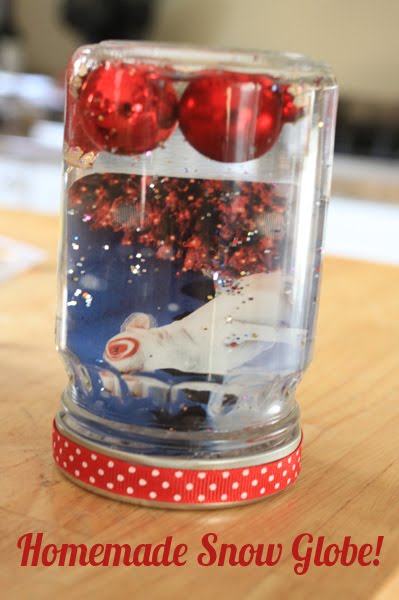
Snow Globe Gift Card Holder
Here is what you need:
- Empty jar & lid (or mason jar)
- gift card
-glitter
-ribbon
-tiny ornaments (or other embellishments)
- glue gun

Step 1: Take your lid & get ready to add ribbon to it.
(I used an old fudge jar & it had writing on it, so I wanted to cover it up. If you use a mason jar you won't need to do that)


Once your finish your lid, now it is time to glue the gift card to the lid using your glue gun.


Put on your lid (make sure it is screwed on tightly so it doesn't leak) and flip it over.
And, there you have it! A Snow Globe Gift holder!
This was super easy & took less than 15 minutes to make.
Such a fun way to give a gift card.
It won't damage the gift card
(I wouldn't keep it in the jar for more than 3 days)
Also, next time I am going to use a larger jar, like a spaghetti sauce jar because the gift card looked very magnified/distorted in my fudge jar.
(The reason I didn't use a mason jar is because I wanted to make sure the jar didn't leak when you flipped it over. Sometimes you can't get that tight of a seal on a mason jar lid.)

Pinterest Project #2
Wrap Christmas books for each day of Advent
I pinned this idea a few months ago & couldn't wait to do it for my girls.
We actually have a lot of Christmas books. 14 of them!
I individually wrapped each book & the idea is that on each night of Advent the girls will get to unwrap a book for us to read. (Kate will unwrap on odd days because her birth year is odd & Claire will unwrap on even days because her birth year is even)
I put all the wrapped books in a basket under our tree. The girls are so excited about unwrapping the first book tonight.
Because I only had 14 books, last night I ordered a few more books from Scholastic because I get a teacher discount & books were only $3. I also wrapped up one of the girls picture bibles and on the night they unwrap the Bible, we will read about the birth of Baby Jesus. (I think I will save that one for December 24th). Also, I am going to check out some more Christmas books from the library & wrap those up later this week so that we have 24 books.

Pinterest Project #3
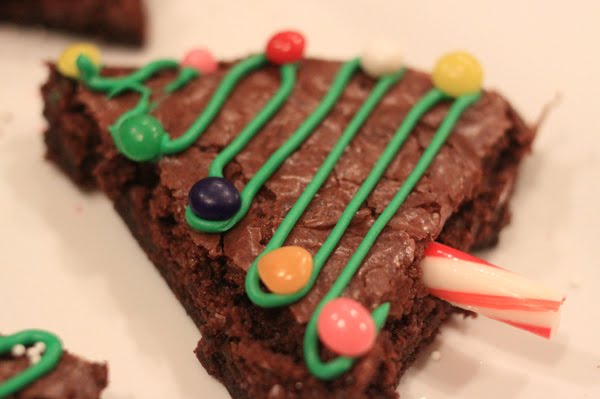
Brownie Christmas Trees
Here is what you need:
Box of Brownie Mix, Green frosting, sprinkles, candy canes.

Make Brownies according to package directions.
I normally make my brownies in a 8x8 or 9x9 pan because I like them thick, but for this project, I made them in a 9x13 so that I could get more brownies.

After my brownies cooled for a couple hours, I cut a triangle out of paper to use as my tree template.
I then cut out triangle brownies.
Get your decorations ready:
You could use sprinkles, m&m's, or whatever!
Use your green frosting to decorate, add some sprinkles & break off some candy cane as your trunk. And, there you have it, a Festive Treat!
Here are some of the other ones we made:


A 9x13 dish would make 8 brownie Christmas trees (we only made 6 because we may or may not have been snacking on the other 2....)
This was another fun & very easy Pinterest Project!
Yeah for 3 Pinterest Sucesses this month!

Linking up with Jess:

Also, don't forget about the 2nd Annual Cookie Recipe Exchange Link Up next Wednesday, 12.07.11


LinkWithin

Blog Widget by LinkWithin