Showing posts with label breakfast. Show all posts

1.18.2018

Mel's Light & Fluffy Pancakes

Most Saturday mornings I make a big breakfast or brunch for us enjoy.
I make pancakes, waffles, french toast or Monkey Bread.
Sometimes we have bacon & eggs alongside our carbs :)
For the past several years, I would make Pancakes & Waffles from the box mix. Sometimes it was the just add water mix and the pancakes (and waffles) never turned out good. They were tough & bland. 
They never tasted like the ones you would get at your favorite breakfast spot.
Sometimes I would use Bisquick & their recipe for Pancakes & Waffles. Still not that good. Still tough/dense and not light & fluffy.

A year ago, Kate & Claire went to an American Girl cooking class at Williams Sonoma and they made Waffles from scratch. The girls said they were the best waffles they have ever had.
They got to bring  he recipe home and whenever we have waffles, Kate would make us the waffles from scratch. They were SO MUCH better than the box mix.  They were light & fluffy and tasted like restaurant quality. It inspired me to make pancakes from scratch and get light & fluffy pancakes.
As some of you know, my 105 year old Grammy loved to cook & I got her recipe box and her cookbooks. She had a recipe for Buttermilk Pancakes, so I tested it out. It was way better than Bisquick or a box mix, but it still wasn't perfect. After doing some research, I decided to tweak Grammy's Buttermilk Pancake mix. Instead of using store bought Buttermilk, I could make my own Buttermilk "soured milk"  using milk & vinegar.  I followed Grammy's recipe but instead of using store bought Buttermilk, I used my "soured milk" and BINGO!!! 
Pancake Perfection. Restaurant Quality.
A few weeks ago,  I posted about these pancakes on Instagram and a lot of people commented that they wanted the recipe, so here you go! 
Here is what you need.......
1 1/2 Cups of Milk
1/4 Cup of White Vinegar
2 cups of flour
1/4 cups white sugar
2 teaspoons baking powder
1 teaspoon baking soda
1 teaspoon salt
2 eggs
1/4 cup melted butter
*Optional: 1/2 teaspoon of vanilla

Cooking Spray or more butter for the skillet (I use butter for the skillet)

 Directions:
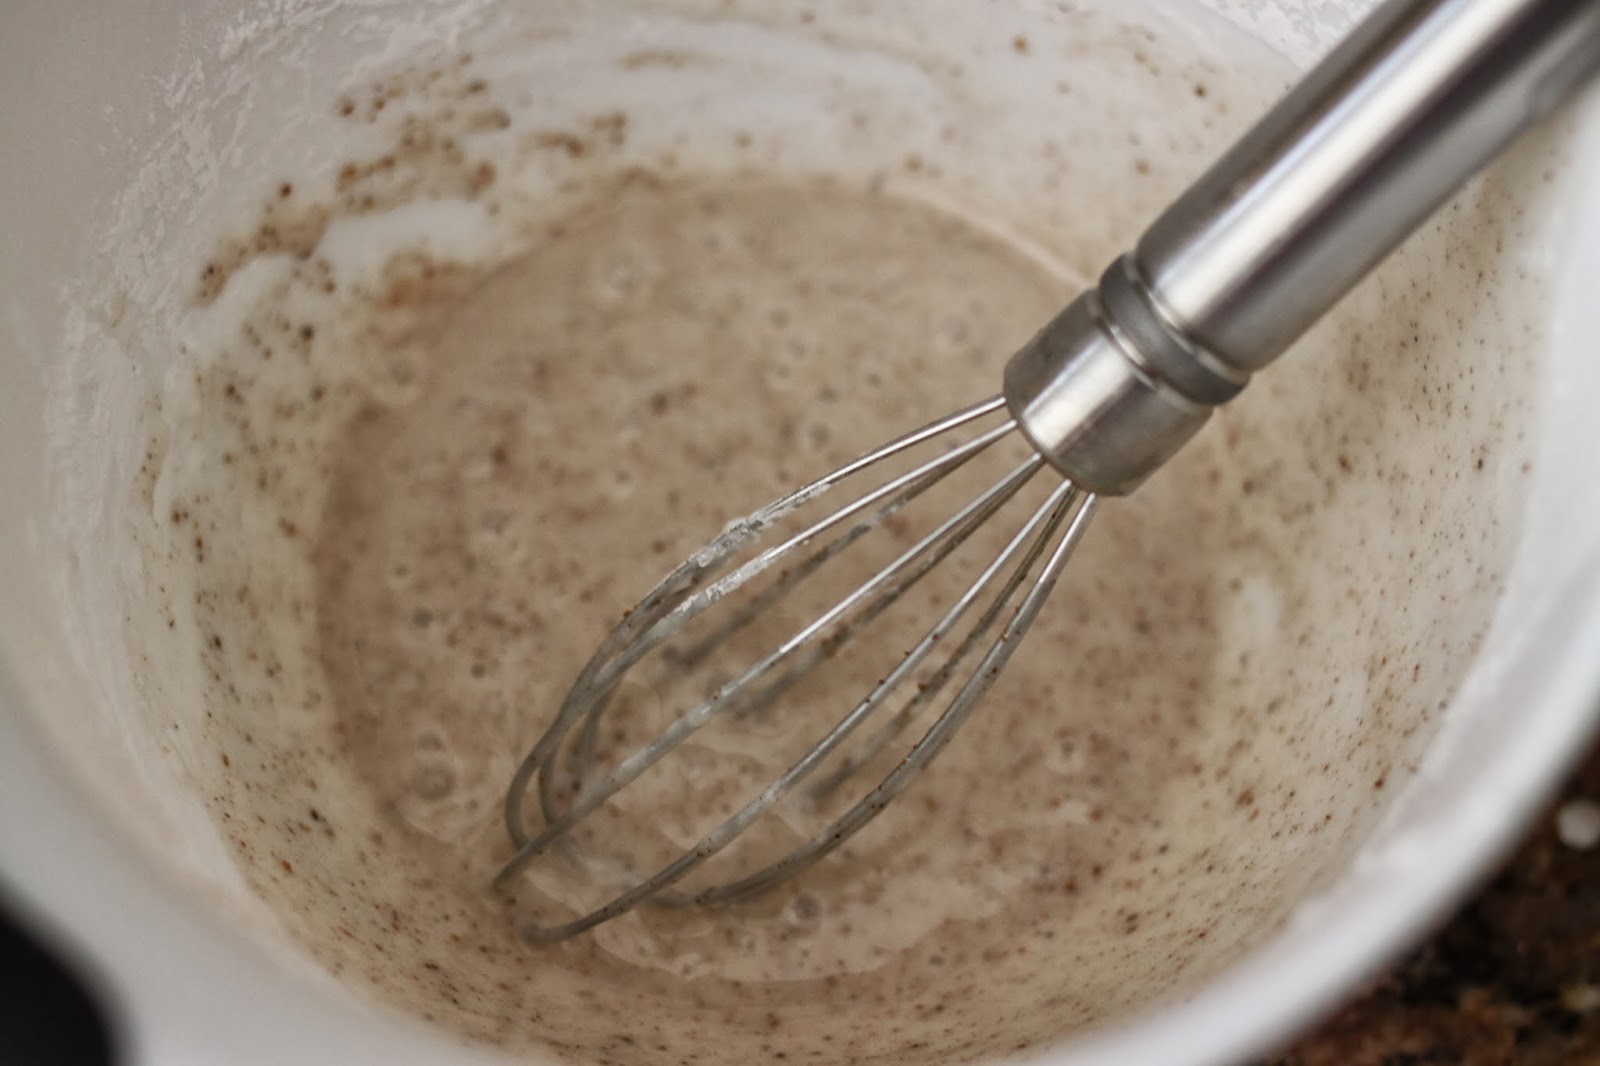
Combine your milk & vinegar. Set aside at room temperature for at least 10-15 minutes.
This is basically making your own buttermilk...also known as "soured milk" and this is one of the keys to light & fluffy pancakes. This makes all the difference!!!! Do not skip this step!!!
This is what it looks like after 15 minutes...bubbling is good :)
**Side note: Take out your eggs when you start making the "soured milk". You want the eggs at room temperature.
I keep the milk/vinegar in a 2 cup measuring cup. Then after 15 minutes, add the eggs, melted butter & vanilla into the "soured milk:
 Whisk together the milk, eggs & vanilla in into "soured" milk.

Combine flour, sugar, baking powder, baking soda, and salt in a large mixing bowl.
Then, pour the milk/vinegar/egg/vanilla mixture into the flour mixture. 
Stir gently with a spoon or spatula to combine until ingredients are just moistened.
 DO NOT OVERMIX!!!!!
 There should be clumps. This is good! You want the batter to be clumpy!
Again, I repeat.... DO NOT OVERMIX. Keep the batter clumpy!
The gluten in the flour starts to develop as soon as liquid touches it, and the more you mix, the tougher the gluten becomes. Tough gluten means tough pancakes. If your batter has lumps, that's fine....they'll cook out on the griddle. Trust Me :)
We cook our pancakes on an electric skillet. I have it heated to 350 degrees.
I like to use butter on the skillet before I add my batter. 
Adding butter to the skillet is another key to delicious pancakes.

Use a 1/8 the measuring cup & pour the batter onto the hot, buttered skillet. 
 I cook 6 pancakes at a time....after each batch...add more butter to the skillet. 
 A pancake is ready to be turned over when it's dry around the edges and bubbles have formed over the top. 
The second side will cook more quickly than the first.

While you're waiting for the second side to cook, resist the impulse to press down the pancake with your spatula. Look how light & fluffy these are....
 Pressing will not make it cook any faster, and you'll undo all the effort you've made to achieve fluffy, light, perfect pancakes in the first place.
 Who knew pancakes could be so beautiful? LOL!
These taste just like pancakes you would get at your favorite diner or breakfast spot.
This recipe makes between 12-14 pancakes and one batch is perfect for our family of 5.
 These pancakes are light, fluffy & they melt in your mouth.
  I hope you love these pancakes as much as we do! 
I will NEVER, EVER,  EVER make pancakes from a box mix. 
I will always make them from scratch....They taste so much better and they are easy to make!
Once you go scratch, you never go back :)
Let me know if you make them & have success with these light & fluffy pancakes!
Enjoy! 

4.12.2017

Make Ahead Breakfast Casserole

With Easter this weekend, I thought I would share one of my favorite make ahead breakfast casseroles.
It is perfect for Easter Brunch or breakfast.
It's also great to make for baby/wedding showers.
My favorite thing about it is that you make it the night before & then just bake it in the morning.
Another thing I love about this Make Ahead Breakfast Casserole is that you can make several variations of this casserole by switching your add ins.
Here is what you need: 
Package of frozen hash browns (rectangle or shredded)
9 eggs
1 can of evaporated milk
1 1/2 cups of shredded cheese, plus 1/2 cup for the top    
Salt & Pepper, to taste

Add in of your choosing:
One of our favorite versions is....
1 can of artichoke hearts (drained)
1 jar of sun dried tomatoes (drained)
1/2 cup feta cheese
1 lb of chopped cooked bacon

Directions:
Layer the hash browns in a 9x13 dish  
Whisk together the eggs, evaporated milk, salt & pepper.

Just whisk for about 30-45 seconds, it should look like this:
 
Stir in your mix in's:
 
Like I said, our favorite is 1 lb of chopped cooked bacon, can of drained artichoke hearts, jar of drained sun dried tomatoes, feta cheese & shredded cheese (usually sharp cheddar or colby/jack mix)

 Pour the mixture over frozen hash browns:
Cover with foil and store in fridge overnight.
In the morning, remove foil, cover with remaining 1/2 cup of cheese on top:

 
Yum...cheese! 
 
Bake uncovered at 350 degrees for 1 hour
 
Let stand for 10-15 minutes before serving:

This is perfect to make along with my Monkey Bread!
There are SO many variations you can make with this recipe, you just need to have these ingredients as your base:
Package of frozen hash browns (rectangle or shredded)
9 eggs
1 can of evaporated milk
1 1/2 cups of shredded cheese, plus 1/2 cup for the top  
 Salt & Pepper, to taste
  
Another combo that is delicious is adding 1 lb cooked sausage, 1 can of green chilies and using pepper jack cheese.

You can make a ham & cheese version. 

You can also make a southwest version with bacon or sausage & a can of rotel with cheddar & jack cheese.

You can make a vegetarian version with Spinach, mushrooms & diced bell peppers.

Again, this is perfect to make for Easter Brunch, Christmas morning or if you are hosting a baby/wedding shower brunch.

You can make 2 or 3 versions of this dish if you are serving a larger crowd.
If I am making 2 versions of this I usually make 1 version with the hash browns squares & the sundried tomatoes/artichoke hearts/feta/bacon and then I make another version with the shredded hash browns and either sausage/ham with green chilies.

The possibilities are ENDLESS.

I hope this recipe becomes a holiday go-to just like it has for us...I love how I can make it the night before and just pop it in the oven in the morning. Easy!

When you make this, you can serve it with my Monkey Bread  & some fresh berries and you are set up for an easy & delicious meal!

Let me know if you make this & let me know what you added to it!

11.08.2013

Starbucks {Copycat} Pumpkin Scones

 Earlier this year, all the Starbucks in Northern California stopped selling Starbucks pastries, but instead had pastries from La Boulange.
This wasn't a big deal to me until this Fall when I realized La Boulange doesn't make a pumpkin scone!!!
My beloved Starbucks Pumpkin Scones were not available to me this Fall. I was NOT happy about this. I look forward to the Starbucks Pumpkin Scone every October.
My Starbucks Pastry Case. Boo.
When we went to my Granmy's house for her 102nd birthday a few weeks ago,  I went to her Starbucks & was SO excited that they still carried Starbucks pastries (Grammy lives in the Central Valley) You better believe I bought all the pumpkin scones they had at her Starbucks.
#pumpkinsconehoarder
 But, rumor has it that in the next year, Starbucks is replacing ALL their stores to have pastries from La Boulange pastries. Worst News Ever.

This prompted me to search for a pumpkin scone recipe. 
I found one on Pinterest that was for Starbucks Copycat Pumpkin Scones.
I knew I had to make them! 
I read through all the comments and adapted it slightly. 
{Original recipe here

Here is what you need:
 For the Scones:
2 cups flour
7 tablespoons sugar
1 tablespoon baking powder
1/2 teaspoon salt
1/2 teaspoon cinammon
1/2 teaspoon ground nutmeg
1/4 teaspoon ground cloves
1/4 teaspoon ground nutmeg
6 tablespoons cold butter
1/2 cup canned pumpkin
3 tablespoons 1/2 & 1/2 (I used whole milk)
1 large egg

Directions:
 Combine flour, sugar, baking powder, salt, and spices in a large bowl.
 Using a pastry knife, fork, or food processor, cut butter into the dry ingredients until mixture is crumbly and no chunks of butter are obvious. 
 Set aside.

 In a separate bowl, whisk together pumpkin, half and half, and egg. 
 Fold wet ingredients into dry ingredients. Form the dough into a ball.
Pat out dough onto a lightly floured surface and form it into a 1-inch thick rectangle (about 9 inches long and 3 inches wide). 
Use a large knife or a pizza cutter to slice the dough twice through the width, making three equal portions. 
*****Next time I make these, I am going to make the scones smaller. I am going to do  4 or 5 lines instead of 3. ****** 
Cut those three slices diagonally so that you have 6 triangular slices of dough. 
Place on a baking sheet with parchment paper or a Silpat:
 Bake for 14 to 16 minutes. Scones should begin to turn light brown. Place on wire rack to cool.
Now it's time to make the glazes:
There are 2 glazes for these scones. 
The first glaze is the powdered sugar glaze: 
1 cup powdered sugar
1 tablespoon powdered sugar
2 tablespoons whole milk

Mix the powdered sugar and 2 tbsp milk together until smooth.
When scones are cool, use a brush to paint plain glaze over the top of each scone.
When that glaze is hard (about an hour later) then, it is time to make the Spiced Glaze:

1 cup powdered sugar
3 tablespoons powdered sugar
2 tablespoons whole milk
1/2 teaspoon cinammon
1/4 teaspoon ground nutmeg
1 pinch ginger
1 pinch ground cloves 
Combine the ingredients for the spiced icing together. 
Drizzle this thicker icing over each scone and allow the icing to dry before serving (at least 1 hour). 
A squirt bottle works great for this, or you can drizzle with a whisk.
The Result?
Pretty good!
 Did they like look like the Starbucks Pumpkin Scones?
Kind of.
Did they taste like the Starbukcs Pumpkin Scones?
Kind of.
The Starbucks ones are better, but this recipe is a great one to have.
Will I make this recipe again?
Yes! Especially since Starbucks pastries are going bye-bye nationwide by the end of 2014.

Linking up with Jess:

Hope you all have a great 3 day weekend!
If you want more pumpkin recipes, check out my Pumpkin Snickerdoodles {Here
And, there is also a chance to win a $100 Visa Gift Card!

LinkWithin

Blog Widget by LinkWithin